

SSH Login Check Scanner, Hydra, Xhydra, Ncrack, NMap, and so on... These are some hacking tools which allow anyone to scan networks and exploit users and passwords using brute force attacks.
In fact, these tools are really easy to use, so everyone could hack your servers more easily if they use plain user and password to authenticate users than with key-based authentication, so… how can you secure your remote ssh connections against brute force attacks?
The best known solution nowadays is based on asymmetric cryptography, which uses a public and a private key pair to authenticate.
In this post we’re going to explain how to generate your public and private keys to be secure and how to manage them with a config file. Finally we will introduce briefly how Linux ssh-agent works and how you can manage your keys with it.
Asymmetric cryptography
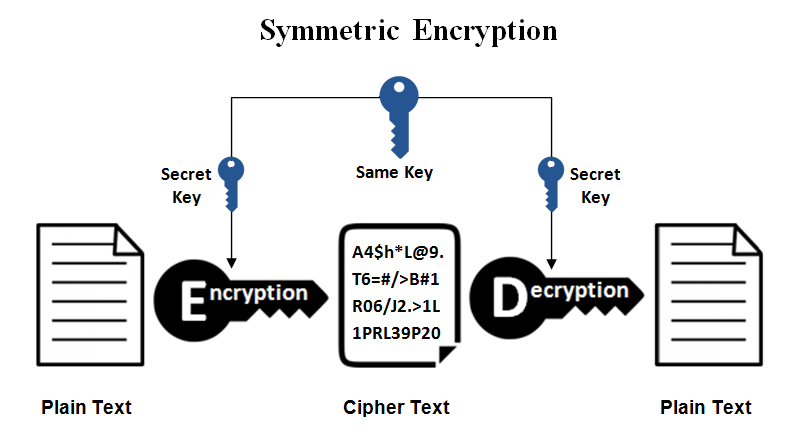
Low complexity encryption systems are usually based in symmetric cryptography, which consist in one key (password) to encrypt and the same password to decrypt.
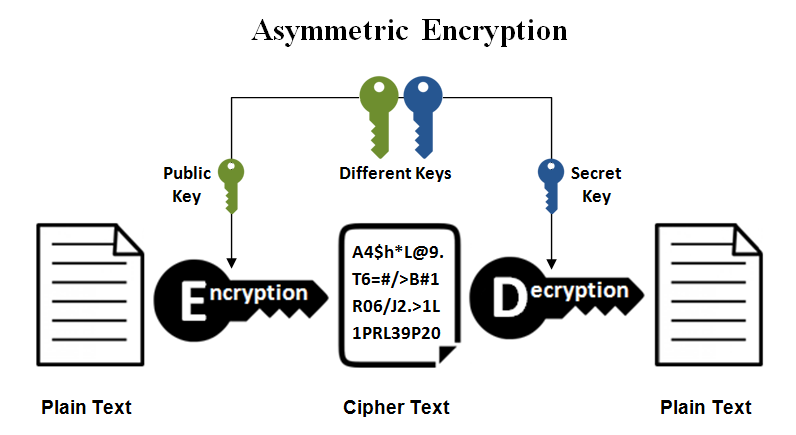
As well as symmetric cryptography, asymmetric cryptography relies on mathematical problems that don’t have an efficient solution, like computing discrete logarithms. This kind of encryption generates two keys, the public and the private (secret) one, so if you don’t know the private key it’s very hard to decrypt the data, the public key could be given to anyone to encrypt the information and only you will be able to decrypt that information cause you’re the only one with the secret key, like is shown in the next figure.
The known algorithms in asymmetric cryptography are DSA, ECDSA, EdDSA and the mostly used RSA.
For more information you can check https://en.wikipedia.org/wiki/Public-key_cryptography .
DSA
Digital Signature Algorithm appeared in 1991 and it’s based on discrete logarithm, this method fixes the key length to 1024 bits. Nowadays security is no longer guaranteed with a 1024 bits or smaller key. For this reason, OpenSSH 7.0 has deprecated and disabled this sort of keys.
ECDSA
Elliptic Curve Digital Signature Algorithm is an improvement of DSA based on elliptic curve cryptography.
RSA
Rivest, Adi Shamir and Leonard Adleman are the Turing-awarded authors of RSA, one of the first asymmetric cryptosystems. RSA is based on integer factorization. It is the most common way to generate key pairs due to its security and portability. It has been broken theoretically by Shar’s algorithm (based in quantum computing techniques). But it is still secure to use it nowadays if its key length is at least 4096 bits.
EdDSA
Edwards-curve Digital Signature Algorithm is designed to be faster than existing digital signature schemes without sacrificing security. It is based on Twisted Edwards Curves. This algorithm is quite new (2012) and it is not available everywhere yet since it was introduced on OpenSSH 6.5 in 2014.
Generating the SSH keys
First of all, what kind of digital signature should you use: DSA, ECDSA, EdDSA or RSA? Forget to use DSA and ECDSA, they are INSECURE!
So, your first option must be ED25519 since it means less authentication time (time needed to verify the public/private key pair). The main problem with EdDSA is that it requires at least OpenSSH 6.5 (ssh -V) or GnuPG 2.1 (gpg --version), and maybe your OS is not so updated, so if ED25519 keys are not possible your choice should be RSA with at least 4096 bits.
Another security recommendation is to set a passphrase. The passphrase is similar to a password, which will be asked to use your private key. Depending on your configuration, that could be each time you want to connect via ssh (the most secure way to use it).
Here are basic commands to generate the keys:
|
1
2
|
ssh
-keygen -t ed25519
ssh
-keygen -t rsa -b 4096
|
But... it can be better!
- The -a option to ssh-keygen, as ssh-keygen man page says, it randomizes the passphrase in as many rounds as you define to slow down the password checking in order to frustrate a brute force attack.
- The -o option causes ssh-keygen to save private keys using the new OpenSSH format rather than the more compatible PEM format. The new format has increased resistance to brute-force password cracking but is not supported by versions of OpenSSH prior to 6.5. In case you use Ed25519 keys, they are always using the new private key format.
Finally, when we execute the command, we will be asked for key name and passphrase. Is necessary to set up a passphrase for each ssh private key. This passphrase is required each time it is used or when you add the key to the ssh-agent (a much less bothering method but a bit less secure), but this will be explained in the further sections.
If you want to read more about ssh-keygen we recommend you the Linux man page or just the `man ssh-keygen` command on your terminal.
Creating a .ssh/config file
To manage our keys we can create a config file in $HOME/.ssh. Here we basically declare the hosts where we want to connect to and which key use each, but this file could handle more specialized options. Here is an example:
|
1
2
3
4
5
6
7
8
9
10
|
# GitLab
Host gitlab.com
HostName gitlab.com
IdentityFile ~/.ssh/id_rsa_gitlab
# Raspberry Pi
Host raspberrypi
HostName 192.168.0.168
IdentityFile ~/.ssh/id_rsa_raspberrypi
User pi
|
For more information about config options read this: https://www.ssh.com/ssh/config/ .
Starting the ssh-agent session
ssh-agent is a program that runs in each shell, it stores unencrypted keys (it decrypts the keys using your passphrase) and manages the ssh connections.
There are multiple options to run the agent. We recommend one of the following:
- Execute eval $(ssh-agent) in each shell we need to use ssh.
- Add eval $(ssh-agent) > /dev/null in your bashrc file, so we will have an ssh-agent running in each shell although you don’t need it.
Once the agent is running we may need to add the required keys, if not the passphrase will be asked each time you need the private key, when adding the keys to the agent the system caches the passphrase while the shell is running, so if you open another shell you will need to add again the key and write its passphrase. The way to add a key to the ssh-agent is with the following command:
|
1
|
ssh
-add ~/.
ssh
/my_id_rsa
|
It is also possible to automate this part in the .bashrc but it is not recommended at all. If you do so, you are going to be asked for the passphrases in each opened shell although you don’t want to connect anywhere.
Our recommendation is to add the next bash functions in your .bashrc file to manage the ssh-agent and the keys:
|
1
2
3
4
5
6
7
8
9
|
function
ssh_agent_run(){
eval
$(
ssh
-agent)
ssh
-add -D
}
function
ssh_agent_add_key(){
local
-r key_name=
"$1"
ssh
-add
"$HOME/.ssh/$key_name"
}
|
Useful commands:
- List the added keys: ssh-add -l
- Delete all added keys: ssh-add -D
Conclusions
In this post you have learned how to generate more secure ssh key pairs using ssh-keygen. And also, how to manage all your keys with the ssh-agent and the ssh config file.
To resume all in a nutshell, there are two types of key pairs considered secure, EdDSA and RSA. The former is not compatible with outdated systems but use it when possible. RSA is the most used type of key pair authentication but the key length must be of at least 4096 bits because of the compute capacity of nowadays computers. While generating the keys with ssh-keygen there are lots of possible options to take care, specially -a and -o. Once the keys are generated you can organize them into a config file. And finally to make the ssh-agent management easy we shared with you some bash functions to add to your .bashrc.
References
- https://www.ssl2buy.com/wiki/symmetric-vs-asymmetric-encryption-what-are-differences
- https://en.wikipedia.org/wiki/Public-key_cryptography#History
- https://security.stackexchange.com/questions/5096/rsa-vs-dsa-for-ssh-authentication-keys/46781#46781
- https://wiki.archlinux.org/index.php/SSH_keys#Choosing_the_authentication_key_type
- ssh-agent man page
- ssh-add man page