What is the Facebook Pixel, what events can I include and everything that this pixel will allow you to incorporate in your Facebook and Instagram Ads campaigns. A key tool to optimize your strategy and monetize your budget.
Let's go for it!
TABLE OF CONTENTS
- What is Facebook Pixel?
- What types of events can be included in the Facebook pixel?
- What does the Facebook pixel allow you to do?
- How to install a Facebook pixel?
What is Facebook Pixel?
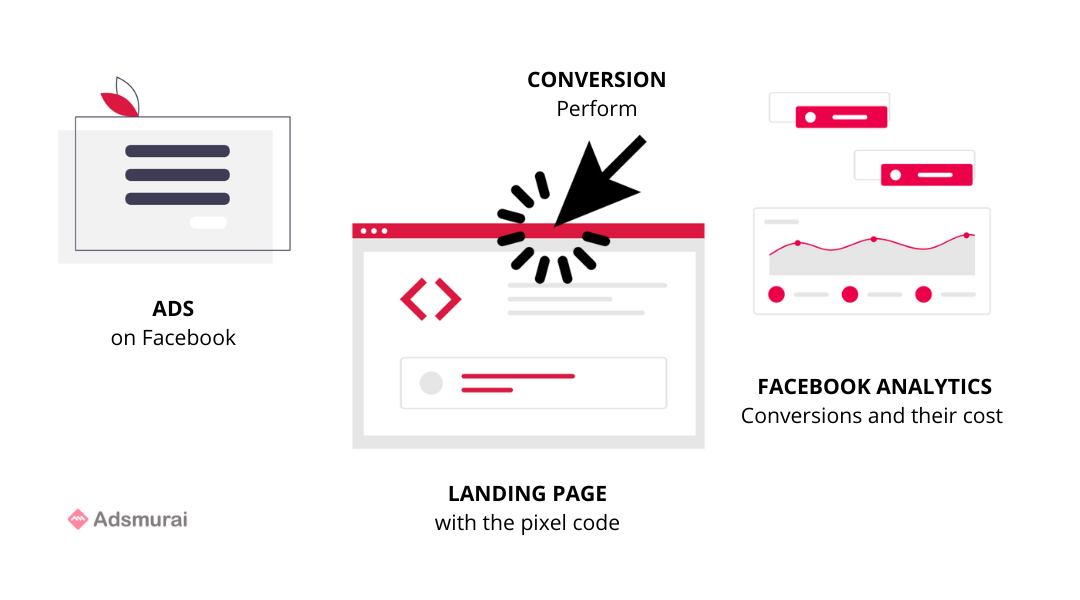
The Facebook pixel is a code that allows us to track both user behavior and the effectiveness of our Facebook Ads campaigns.
In addition, the importance of the conversion pixel in your digital strategy is key to maximize your budget. It is an ideal tool to know how many conversions our ads generate on the platform and what is the cost of each conversion.
Currently, it is only possible to create one pixel per Facebook advertising account. All your ad campaigns are collected under the same pixel.
Surely your question now is, how does the Facebook pixel work? Every time the user interacts with our web page or ad on Facebook, the Javascript code installed on our domain is activated and stores the user's activity information in the event manager.
What types of events can be included in the Facebook pixel?
The actions carried out by the user on your website activate the Facebook pixel and are recorded as events: users who have visited your website, users who have purchased a product or service, users who have added a product to the shopping cart, users who have completed a registration form...
Once the Facebook pixel is installed, to be able to count all these actions that take place on our website we must create standard events or custom conversions. What is the difference between these two options?
-
Standard events: These are created by adding the base code of the Facebook pixel, can be customized with parameters and are compatible with Dynamic Product Ads (DPA). Reports for these events are generated together. Currently, we can configure up to 9 standard predefined Facebook events: Payment information added, item added to cart, item added to wish list, completed registration, contact, customize product, donate, find location, checkout initiated, lead, buy, schedule, search, start trial, submit request, subscribe and content viewed.
-
Custom conversions: To create them no additional code is needed, we can do it from the ad manager using URL rules. They are not compatible with dynamic product ads and reports are generated separately. For each ad account, Facebook allows to create 40 custom conversions.
What does the Facebook pixel allow you to do?
As you might have guessed, the Facebook pixel collects information that will allow us to optimize ads, run retargeting campaigns and create custom audiences to target users with a higher likelihood of conversion. Let's break down some of the benefits of using the Facebook pixel.
-
Get to know your audience better: The pixel will allow you to obtain data related to age, gender, hours of visit to your website... So you can focus your ads to the right people and identify who your ideal customer or buyer persona is.
-
Reach more customers: Thanks to the pixel you will be able to create custom audiences based on users who have entered the website or a specific page, users who belong to your databases or users who have interacted with your publications. In addition, with this information it will also be easier to create lookalike audiences with similar characteristics to your current users. These users are also potential customers for your brand.
-
Knowing user behavior: Through those users who access your website through your Facebook Ads, we can know the user's behavior on it. Fact: It is a way to know possible usability failures in the purchasing process!
-
Measure campaign results: The events are associated with the objectives of the campaigns, for this reason, when the user's activity triggers a particular event we say that we have a conversion. With the Facebook pixel you can measure these conversions, know what is the ROAS (Return on Ad Spend) and determine whether your campaigns are profitable or not.
-
Optimizing Facebook and Instagram Ads: There are a wide variety of aspects where the information provided by the Facebook pixel will help you optimize your Facebook and Instagram ads, and achieve better results in your campaigns, for example:
-
Implement a wide variety of personalized conversions to obtain more defined and detailed information that will allow us to optimize our ads.
-
Perform different ad groups and different ads in each group to analyze which ones convert more. It is also a way to detect possible failures in the sales funnel.
-
Analyze the information of users who interact with your brand's website and your campaigns to optimize delivery to people most likely to perform an action.
-
-
Launch retargeting campaigns: Through retargeting campaigns we manage to retarget users who have previously interacted with the brand but have not performed a specific action. Don't let your potential customers slip away!
How to install a Facebook pixel?
Step 1: Create the pixel
From the Ads Manager in your business account, go to "Measure & Report" - "Pixels" and create a pixel. Remember to name it and add your website URL - the name should represent your business, not an ad campaign!
Step 2: Implement the pixel on your website
There are three options for connecting your website activity with the Facebook pixel, depending on the platform your website uses.
-
Add the code with a partner integration: If you use a CMS that requires minimal technical support, contact one of Facebook's partners such as Shopify.
-
Email instructions to a developer: If you don't have access to the code base, send instructions and documentation to your support team.
-
Add the pixel code to the website manually: If your website needs little technical support, you can add the pixel manually. Copy the code that appears in the pop-up window, paste it after the <head> tag and just before the </head> tag in the header section of your website and check that you have installed the pixel correctly.
Step 3: Add event codes
Set up an event code for each action that takes place on your website that you want to track. The event configuration tool is quite intuitive, you only need to add this code on those pages where you are interested in measuring that goal!
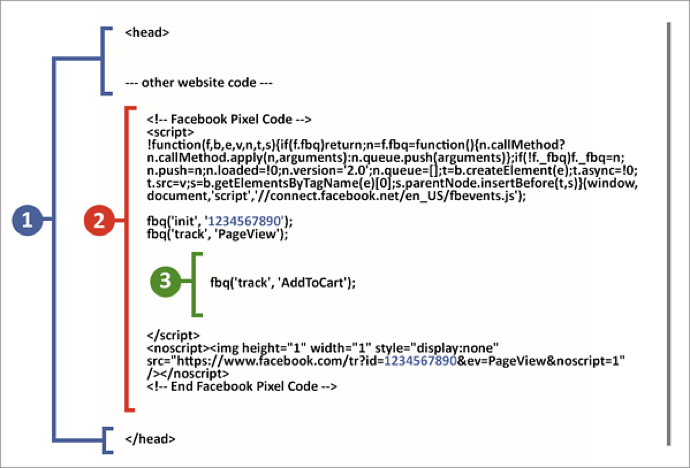
1 is the original code of your site, 2 is the base code of your Facebook pixel and 3 is the code of the configured events.
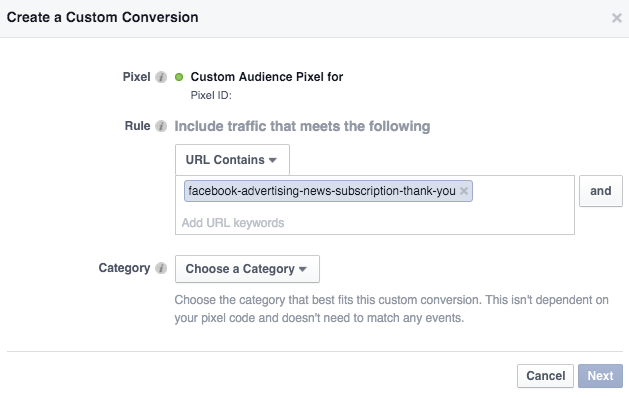
Step 4: Create custom conversions
Custom conversions will allow us to measure more specific actions. You can create them from Ads Manager > Custom Conversions > Measure & Report > Create Custom Conversion.
Remember to assign a name to your conversion, choose the conversion event you are interested in measuring, select the category you want to measure, define the rules for the conversion to be recorded and test your conversion from the URL you are going to redirect users to.
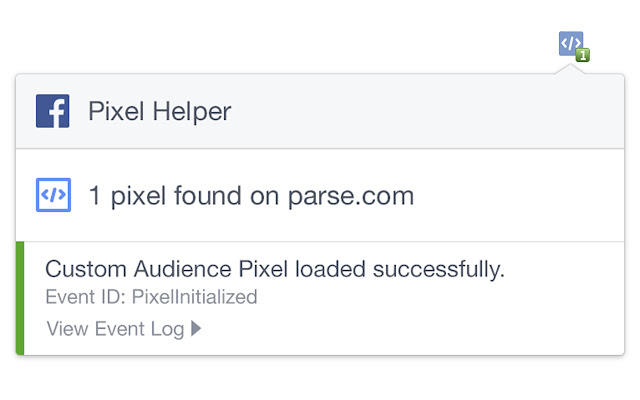
Step 5: Verify that the code is properly installed
Don't forget to verify that the Facebook Pixel and events are properly installed! To do this, install the Facebook Pixel Helper extension in the Chrome browser. Once installed the icon </> will appear in the top bar of the browser, every time it detects that there is a pixel installed on a page it will turn blue. In the pop-up window that appears by clicking on the icon you can check that all events are correctly installed.
Now you know what Facebook Pixel is, what events you can include and everything that it will allow you to incorporate in your Facebook and Instagram Ads campaigns. As you can see, it is a key tool to optimize your strategy and monetize your budget.
Do you need help? Let our Solutions Engineering team help you overcome any technical challenges you may encounter along the way, implement and configure everything you need to make your investment a success!